Go Green For Cheap
Looking to become more environmentally conscious and savvy? Or trying to decrease the environmental impact your house contributes to the Earth?
Below are a list of improvements you can make to easily and cheaply Go Green!
- Insulate Switches and Outlets – It is a little-known fact that light switches and outlets are very drafty. This causes air from the inside to seep outside – it’s very wasteful. You can easily get your hands on some pre-cut insulating foam gaskets to ensure the prevention of energy.
- Grow a Veggie Garden – By starting your own garden, you are able to save money on groceries and eat healthier at the same time! Veggies with high-yield rates include tomatoes, cucumbers, green beans, and peppers.
- Prevent Drafts with Drapes – Drapes are a great way to prevent cold drafts as well as the loss of heat through windows. You can actually get drapes with insulating thermal material to most effectively keep cold out and heat in during the winter while keeping heat out and cool in throughout the summertime.
- Weatherstripping – There are many ways you can lose the effectiveness of your heating/cooling system through cracks throughout your home. A huge problem can be the cracks under doors and around windows. You can prevent losing energy by installing weatherstripping to those leaky doors and windows. This stops the air flow and improves overall efficiency.
- Collect Rain Water – If you think about it, it costs about $150 each month to irrigate a lawn during the summer. But, you have a free water source that comes directly to your home: rainfall. By using rain barrels to gather rainwater that falls off your roof, you can save on your water bills and help prevent the waste of fresh, drinkable water.
Beautify Your Yard: A Guide To Making Your Own Compost
Feeling like you need to spruce up your garden this coming spring? One thing you can do to completely revitalize your yard vegetation is cultivate your own compost!
Composting is the controlled decomposition of organic waste. For gardening purposes, compost adds a much needed boost of vitamins and nutrients to your yard or garden. In just a few easy steps, you can create a natural additive to your garden to ensure optimal growth. Best of all, the practice is environmentally friendly, adding one more incentive to start utilizing the practice.
This spring, try composting instead of spending loads of cash on chemical-filled fertilizers. Here are a few tips and tricks to get you started…
And now for the composting!
You’ll need a large container, or something simple like a trashcan to gather all the recyclable scraps you’ll be making your compost out of. The bin acts as an incubator to accelerate decomposition. The decomposition breaks down organic matter to release nutrients, vitamins, and minerals that are essential for plant growth. Some of these minerals and nutrients include nitrogen, phosphorous, calcium, and potassium among others.
You can add yard trimmings and leaves to your compost as well. This vegetation will also decompose and break down and help cultivate and enrich your compost. It is also a great way to use yard trimmings in a productive, organic way instead of just leaving it out on the curb.
Use all the organic waste produced from what you eat and when you cook. Your kitchen’s food scraps will create a great deal of your compost soil, as you add it daily after cooking and preparing meals and snacks.
According to Professor Rot of Home Composting, the average household throws away about 474 pounds of food per year. Food scraps unfortunately make up about thirty percent of this country’s total waste stream, leaving a lot of room for improvement when recycling or composting. You can add vegetable stems, fruit cores, coffee grounds, old grains, eggshells, or rotting fruits and vegetables. You could also add the leftover water used to cook rice and pasta. Do not add meats, oils, or dairy to your compost, as it will imbalance the nutrient-rich structure of the other organic material. Meats and dairy can also attract maggots and rodents, ruining your compost.
And then you wait. Composting is not a complicated, labor-intensive process. You can add organic waste from time to time and let the process move forward on its own. However, you could also accelerate the process by adding water, and turning the soil on a biweekly basis. The latter method will have your compost ready in one-two months.
Composting can be a fun and environmentally friendly way of managing and discarding your yard and kitchen wastes. So, don’t let your waste go to waste, and try composting instead!
If you liked this post and would like to read more on “DIY” tips and tricks, follow me on twitter @TerryFebrey. Thanks for reading !
How To Make The Most Out Of A Small Space
Being faced with the task of designing and organizing the interior of a home or even one room of a house can be daunting. What’s more challenging is if that space is limited spatially. There are certain rules one should adhere to when making a plan for a room, and with a smaller space, these guidelines become more specific and crucial for a successful turnout.
Here are the basic guidelines for ANY small space:
- A tiny room does not have to equal tiny furniture and tiny items. Sometimes a space with one larger piece of furniture feels more comfortable than a small space with a few small items.
- Get rid of junk and plan organizing accordingly. Get rid of the stuff you really done need and THEN take inventory of what needs to be organized. You’re better off planning your organization and storage around what you have rather than the other way around.
- Utilize glass and mirrors strategically. Reflect and maximize light with glass and mirrors in small spaces. You can easily do this by placing mirrors in corners and other locations around the room and by opting for glass items like coffee tables and frames to add surfaces that are reflective.
- Make sure windows aren’t covered at all. When you have curtains, you ensure that the entire window pane can be exposed providing the most light possible. Consider hanging curtains from the ceiling as opposed to the top of the window frame – this adds drama and height without blocking any light.
- Always be working upwards. Since a smaller space is lacking is area, work you way up when thinking storage and decoration. Hanging art higher draws the eyes up and gives the illusion of taller ceilings. Smart use of shelving and storage that grows taller instead of wider is ideal in a small space.
Color Schemes
Spruce Up Your Home: DIY
The trend of DIY has skyrocketed, from doing your own home renovation to decoupaging jars to making homemade chocolate gifts. DIY is huge. However, it definitely can be intimidating taking on a project on your own. Sometimes it’s best to wade into something new one small step at a time.
Here are a few DIY ideas to help decorate your home, allowing you to join the DIY movement without going native… yet!
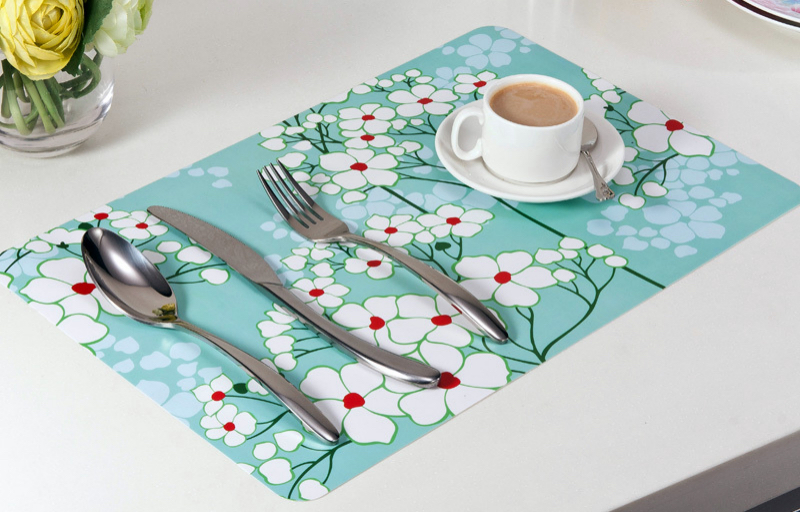
DIY Placemats: Is it just me or are placemats either super expensive or just plain ugly? Why now make your own then and have them look exactly how you want! All you need is some heavy “home decorating” fabric with a pattern or image of your choosing, some iron-on vinyl topping (found at most fabric stores) and some pinking shears. Cut the size of your placemats for the fabric and the vinyl, iron the vinyl on both sides of the fabric (one of the from, one on the back), and trip the edges with some nice pinking shears to five your new mats a nice finish. Now you have beautiful placemats that are functional and fancy! photo: aliexpress.com
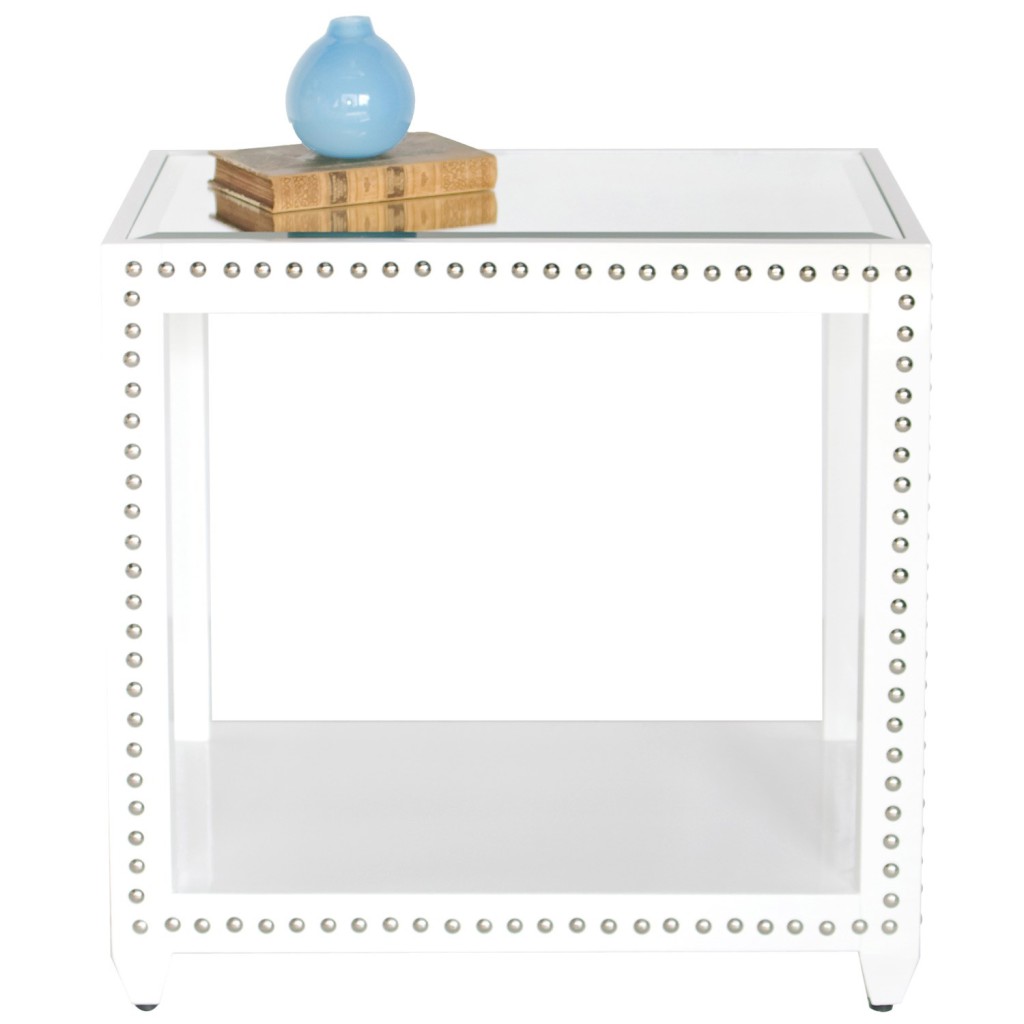
DIY Studded Furniture: If you’re looking to add some pizazz to an old wooden chair, table or bench or you don’t want to spend money on ornate furniture? Head to the hardware store or a fabric store and get some upholstery tacks! They come in many different sizes and finishes and are very easy to add to a number of wooden pieces. Just push or tap them in along an edge for a nice, shiny detail. This will add a bit of life to an otherwise bland piece of furniture. photo: matthewizzo.com
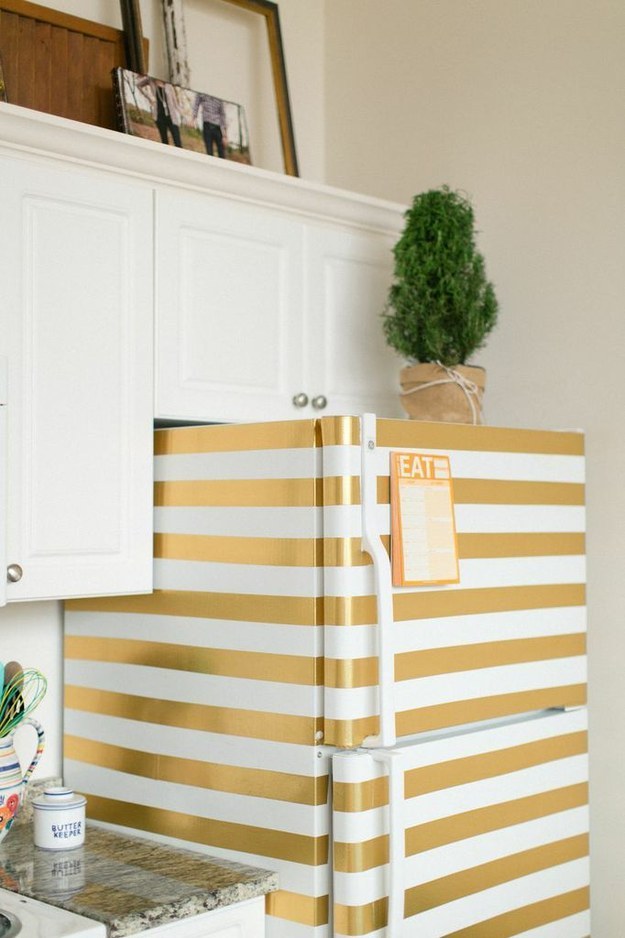
DIY Striped Refrigerator: This is a simple, easy way to completely change the look and feel of your kitchen. You can do this multiple ways: with washi tape, spray paint, or metallic duct tape. Regardless of the method you with you use, you’ll want to use a pencil or washable marker to map out where your material will go. Either way, it’s going to make you love your kitchen even more than you already do. photo: theeverygirl.com
Increase The Value Of Your Home While Remodeling With These 4 Tips
Once you’ve purchased the house you’ve been searching for, you will have to keep in mind (if you ever want to resell) that it will need some work before you leave. Don’t focus so much on trends as those can come and go. Here are 4 tips to think about when getting started:
1. Speak with your real estate agent
Agents are always in the know about what buyers are looking for. They know what finishes, amenities, or upgrades that your home will be expected to have. Consult with an agent to know what qualities are being looked for to make smart decisions on your remodeling work. They will be able to tell you exactly what you will receive on a return and what you will lose money on.
2. Research
Find out what remodeling projects you can do easily and inexpensively. Remodeling your kitchen is usually one of the more expensive operations, but it is always a good investment. Kitchens receive a great return. This is a good place to start in your renovations if you’re having a difficult time deciding.
Note: Also, think about how you can utilize the space you’re renovating in the most efficient way.
This well hope you create the best design for your project.
3. Consult with an interior designer
After you’ve completed your projects whether it’s a bedroom, bathroom, or kitchen, it’s a good decision to consult with an interior designer about your new space if you’re not feeling confident on your color scheme or design eye. When selling your home, you can have all the right materials and furnishings in your home, but if their display is visually unappealing then you’re not doing yourself any favors. Most home improvement and furnishing stores have their own personal designer on hand. Generally, if you pop in and consult with them, these services are free.
4. Plan for the unexpected
Things come up, and things go wrong. Don’t allow yourself to get frustrated. Plan to have a problem occur. Hidden costs in your renovations come up, and you have to handle them. When creating a budget for your projects, add 10% to the price for problems that may materialize.
Info courtesy of Time Magazone
Fun DIY Project Ideas
Try these ideas with your family! DIY is a fun way to connect and learn skills. Enjoy!
Why DIY Projects Are Good For You

“Makers” come from all walks of life. Building a project is a pleasure that can be shared with almost anyone. The one major characteristic that unites all DIY’ers is the fact that they all have the courage to fail.
Most people, or even all people, find it difficult to accept or embrace their mistakes. The sad part of this conditioning is that people go through their lives shutting out opportunities that might cause them to fail. People who love doing DIY projects go into each project accepting failure, but trying their best of course. They actually welcome failure because they realize that mistakes are a huge part of learning and a source of inspiration.
Everyone makes mistakes. The important thing is to make sure we learn from them and use them as tools to complete our next project. DIY projects are not only great for building self confidence and learning from your mistakes – it’s about having fun and enjoying the benefits of building something!
Here are three main benefits from having courage to mess up:
1. You will gain an appreciation for all the things you have and what makes them possible.
2. You will gain a deeper connection to things that keep people healthy and happy.
3. You will find an opportunity to use both your hands and your brain.
The sense of reward earned from creating something with your hands cannot be duplicated. It is a great feeling of accomplishment to hold something in your hands that you’ve finished.
